The Singer’s Guide to Vocal Compression: What It Is and How to Use It
Let’s face it:
Sometimes you need more than just a pretty voice.
You need edge. Grit. Power.
That powerful, emotional quality that makes listeners actually feel something.

But here’s the problem:
Most singers have no idea how to add more power to their voice without destroying their vocal cords in the process.
Just look at what happens when singers try to add vocal compression without proper technique:
They strain and push… Their voice gets tired after just one song… They sound harsh instead of powerful…
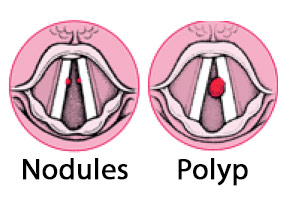
And worst of all, they risk serious vocal damage such as vocal nodules or polyps!
But what if I told you that you could safely add vocal compression and rasp to your singing without wrecking your voice?
Sound too good to be true?
It’s not.
Today, I’m going to show you exactly what vocal compression is, why it’s so powerful in contemporary music, and most importantly…
…How to use it safely so you can add that edge to your voice without the damage.
Ready to unlock that edgy, emotional sound you’ve been searching for? Let’s dive in!
What Is Vocal Compression? (And Why You Might Be Confused)

Before we go any further, let’s clear up some confusion.
Audio Compression vs Vocal Compression
If you’ve been searching for information on “vocal compression,” you might have found articles about audio engineering compression.
This is where producers use software or preamps to boost the quiet parts and reduce loud parts of a recording to even out the volume of the performance.

But that’s NOT what we’re talking about today.
When singers talk about vocal compression, we’re referring to a vocal technique that creates a more intense, powerful sound in your voice.
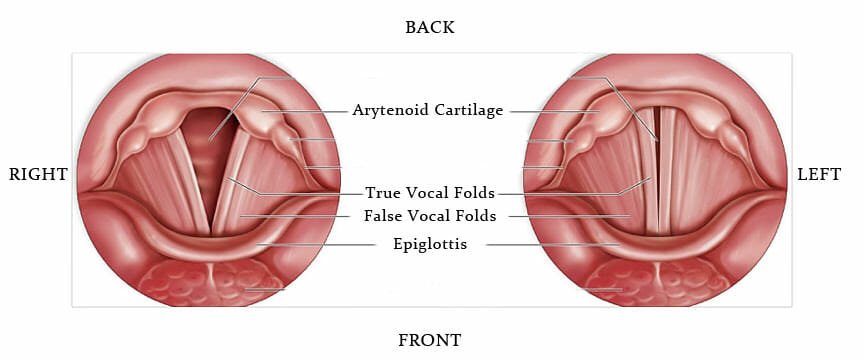
It’s about how your vocal folds come together and how much air pressure you use when singing.
Think of the difference between Billie Eilish’s breathy, flowing tone versus the raspy edge that Chris Cornell or Bruno Mars brought to their performances.
That clean, powerful tone with a hint of rasp?
That’s vocal compression in action.
What is Vocal Compression?
Okay, let’s get into it…
From a technical standpoint, vocal compression happens when you increase the firmness of your vocal fold closure while balancing it with higher breath pressure.
I like to compare it to driving a car.
If you have a crappy engine, even with a full tank of gas – you’re going nowhere.
Ditto for if you have a great engine with an empty tank. Same result.

The same idea is true for your singing voice.
If the vocal folds (similar to the engine) aren’t vibrating fully, you’ll get a hollow breathy sound – even with lungs full of air.
The same is true if the vocal cords are vibrating perfectly, but there’s no breath to support them.
The result?
Lack of tone, strain and pushing your voice.
So here’s what vocal compression actually looks like in singing:
Your vocal cords come together completely, creating more resistance to the airflow – balanced with the amount of breath pressure you have.

This creates that compressed, edgy quality that adds character and emotion to your voice.
The key word here is “balance.”
Too little compression and you sound breathy and weak. Too much compression and you’re straining, squeezing, and heading toward vocal damage.
But like with all things in singing, there’s a Goldilocks zone – where the vocal cord closure and breath support are perfectly balanced and you can sing with grit, power and distortion.
And that’s what we’re going to find today!
Why You Want “Vocal Compression”…

So why do singers want to learn vocal compression anyway?
Because it’s one of the most powerful tools for emotional expression in contemporary music.
Vocal compression and distortion add:
- Raw Emotion That slightly rough, compressed quality makes your voice sound more vulnerable, intense, or passionate. It’s why rock ballads hit so hard – the compression adds authenticity.
- Power and Edge A compressed sound cuts through a mix better than a breathy tone. In rock, pop, and musical theater with a contemporary edge, compression gives you the punch you need to be heard.
- Vocal Character Let’s be honest – sometimes a perfectly clean tone sounds a bit boring. Compression adds texture and personality that makes your voice memorable and distinctive.
- Authenticity If you’re singing rock, contemporary pop, or modern musical theater, some degree of vocal compression is often essential to the style. A completely clean, classical sound just won’t fit the genre.
So now that you know WHY singers want to add vocal compression, let’s look at some examples of singers that use it to great effect…
Where You Hear Vocal Compression in Music

Vocal compression is most commonly found in rock music, contemporary pop, and musical theater pieces with an emotional edge.
Artists Who Use Compression Well:
Listen to how these artists use vocal compression to add emotion without destroying their voices:
Chris Cornell (Soundgarden, Audioslave) – Master of controlled rasp and distortion, especially in songs like “Black Hole Sun”, and “I Am The Highway”.

Adele – Uses subtle compression for emotional intensity on sustained notes, particularly in “Rolling in the Deep”, and “Hello”.

Chester Bennington (Linkin Park) – Combined clean singing with aggressive compression on songs like “Numb” and “In the End”.

Pink – Adds just enough grit to stay powerful without sounding strained, especially in “So What” and “Try”.

And so many other artists like Lady Gaga, Freddie Mercury (Queen), Brandi Carlile and Adam Lambert use vocal compression.
Notice how these artists don’t use compression on every single note.
They deploy it strategically for maximum emotional impact, then return to cleaner tones to give their voices a break.
How to Add Vocal Compression Safely

Here’s the most important thing you need to understand:
Vocal compression done right adds character and power to your voice.
Vocal compression done wrong causes vocal damage, fatigue, and can end careers.
The difference comes down to technique.
The Foundation: Balanced Breath Pressure
Before you can add healthy compression, you need to understand the balance between breath pressure and vocal fold closure.
Think of it like this: if you blow too hard without enough vocal fold closure, you get a breathy, weak sound.
If you squeeze your vocal folds too tightly without enough airflow, you get strain and tension.
Healthy compression is the sweet spot where your breath pressure and vocal fold closure work together in balance.
Step #1: Sing with Good Breath Support

As we talked about already, poor vocal compression is the result of an imbalance between vocal cord closure and breath support.
So, before we jump into the exercises, it’s critical to learn to sing with good breath support.
But don’t worry!
Learning to sing with good breath is easy – when done the right way.
Here’s how I like to teach it:
- Stand with a “tall posture” where your feet are hip-width apart. Your shoulders, hips and feet should all be aligned.
- Next, place your hands around both sides of your belly (as if you’re pregnant and feeling the baby)
- With your hands in this position, inhale so that your stomach pushes your hands out
- Make sure that you’re not raising your chest or shoulders, and that you’re not pulling your stomach inward. The only movement should be in your low belly.
- With your hands still in position, sing a phrase and feel that your stomach comes back in as the breath slowly leaves your mouth.
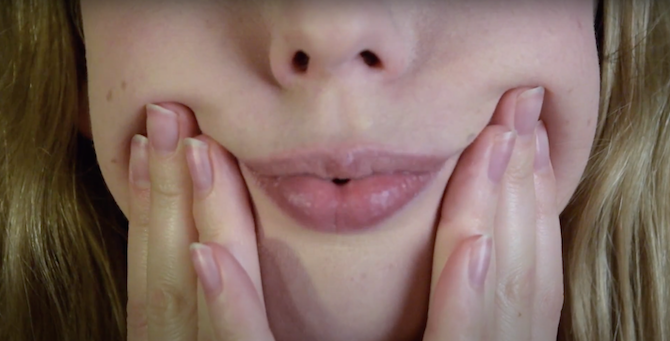
Here’s an example of what your stomach will look like BEFORE you take the low belly diaphragmatic breath:

And here’s what your stomach will look like when you inhale with a diaphragmatic breath:

Why it matters: I have been AMAZED at how just improving the breath support for a singer can enhance their vocal compression.
With the proper “low belly breath”, you can rest assured that your breath control is taken care of and you can focus on the compression exercises..
Now that we’ve covered breath support, let’s jump into the vocal compression exercises…
Five Exercises to Find Healthy Vocal Compression
Let me walk you through the exercises I use with my students to develop controlled, healthy vocal compression.

Exercise #1: The Bratty “Nay”
This is one of my favorite exercises for finding vocal compression without over-squeezing.
How to do it:
- Say the word “Nay” (as in “neighbor”) in a bratty, witchy, almost annoying way
- The sound should be forward, nasal, and edgy—don’t try to make it pretty
- This bratty quality is what creates the compression effect
- Now sing “Nay-Nay-Nay-Nay-Nay” on a comfortable 5-tone scale
- Keep that bratty, compressed feeling throughout


What it does: The bratty quality naturally engages your vocal folds more firmly, creating compression at the vocal cord level rather than through external squeezing and tension.
Pro tip: If you feel tension in your neck or throat, you’re probably squeezing from the outside rather than compressing at the vocal folds. Make it even more bratty and nasal to find the right coordination.
Exercise #2: The Bratty “Nae”
Similar to the “Nay,” but with a more open vowel that works well for certain genres (especially for belting high notes).
How to do it:
- Say “Nae” (rhymes with “nasty”) in that same bratty, witchy way
- The open “ae” vowel gives you slightly different compression than “Nay”
- Sing “Nae-Nae-Nae-Nae-Nae” on a 5-tone scale
- Keep the sound forward and edgy
- Notice how the compression feels in your voice
What it does: The combination of the nasal consonant and open vowel creates firm vocal fold closure while keeping your throat relatively free of tension.
Pro tip: This exercise works especially well for rock and contemporary styles where you need that open, powerful sound with an edge.
Exercise #3: The Sobby “No”
This exercise adds a different flavor of compression through a crying or sobbing quality.
How to do it:
- Think of the sound someone makes when they’re about to cry – that vulnerable, emotional quality
- Say “No” (as in “note”) with that sobby, crying quality
- The sobby sound adds more compression and firmer glottal closure to the singing
- Sing “No-No-No-No-No-No-No-No” on a 5-tone scale
- Maintain that emotional, slightly squeezed quality

Want to Nail Those High Notes?
Every singer wants to expand their range. Expand Your Range Fast will show you how to finally hit high notes in your voice without straining. Expand your range by 5 notes or more!
What it does: The crying quality naturally creates the vocal fold compression needed for emotional, powerful singing without excessive external tension.
Pro tip: This is perfect for ballads or emotional moments where you want intensity without aggression.
Exercise #4: The Sobby “Mum” Exercise
We’ve used the “Mum” in other contexts, but here we’re adding a slightly harder edge for compression work.
How to do it:
- Say “Mum” (as in “mother”) with a strong, projected quality
- Add a slight edge or hardness to the sound—not harsh, just more assertive
- Sing “Mum-Mum-Mum-Mum-Mum” on a 5-tone scale
- Focus on firm vocal fold contact
- Feel the compression in your chest and throat area
What it does: The “M” nasal consonant helps you find firm glottal closure, which is the foundation of healthy compression.
Pro tip: Make sure that you’re focusing on keeping the “Uh” vowel (in the word “Mum”) constant. This relaxes the larynx and keeps you from pushing too much.
Exercise #5: The “Gug” Exercise
In this exercise, we’ll be singing the word “Gug” (as in “gutter”) because it keeps the voice relaxed with the “Uh” vowel, but has the edge created by the “g” consonant.
How to do it:
- Say “Gug” (as in “gutter”) with a strong, projected quality
- Add a slight edge or hardness to the sound – not harsh, just more assertive
- Sing “Gug-Gug-Gug-Gug-Gug” on a 5-tone scale
- Focus on firm vocal fold contact
- Feel the compression in your chest and throat area
What it does: The “G” consonant helps you find firm glottal closure, which is the foundation of healthy compression.
Pro tip: If this feels too aggressive or your voice tires quickly, back off and work more with the bratty exercises first.
Important Safety Note
Here’s something critical: if you feel pain, STOP.

Vocal compression shouldn’t feel painful.
Instead, you may feel that it sounds stronger, more projected and resonant.
But it should never hurt.
Compression is more demanding on your vocal folds than clean singing. If you overdo it, you’ll fatigue your voice and potentially cause damage.
Start with just 5 minutes of compression work per practice session, then gradually build up as your voice gets stronger.
And never practice compression when your voice is already tired or strained!
Common Compression Mistakes (And How to Avoid Them)

Before we talk about applying compression to songs, let’s address the biggest mistakes I see students make.
In fact, knowing what NOT to do is just as important as knowing the right technique.
Mistake #1: Using Too Much Compression
This is by far the most common problem.
Students get excited about that compressed, edgy sound and start using compression on EVERY SINGLE NOTE, for the entire song.
Do this and within 15 minutes, your voice is completely shot.
What it sounds like: Harsh, strained, and exhausting to listen to with the pitch often flat. The compression stops sounding like an artistic choice and starts sounding like someone struggling.
How to fix it: Remember the “bratty” and “sobby” sounds I taught you.
These silly sounds will help you add compression, without straining your voice.
Compression is like hot sauce – a little goes a long way.
Use it strategically on key words, emotional peaks, or climactic moments. Then return to clean, flowing tone in between to give your voice a rest.
Mistake #2: Squeezing from the Outside
Many singers try to create compression by squeezing their neck, throat, or jaw muscles rather than engaging just the intrinsic muscles (their vocal folds) properly.
What it feels like: Tension in your neck, a tight or constricted feeling in your throat, and rapid vocal fatigue.
How to tell the difference: Healthy compression happens at the vocal cord level and feels relatively free in your throat and neck. If you can see visible tension in a mirror (raised shoulders, tight jaw, bulging neck muscles), you’re squeezing from the outside.
How to fix it: Go back to the bratty “Nay” or “Nae” exercises. The bratty quality naturally creates compression at the right level without external squeezing. If these exercises still cause external tension, work with a qualified vocal coach to find the right coordination.
Mistake #3: Starting with Too Much Too Soon
Some students jump straight into aggressive compression exercises before they’ve built the foundational vocal strength and coordination.
The problem: Your vocal folds need to be strong and healthy before you can safely add compression. So build up your compression slowly and gradually – until your voice can handle more.
How to fix it: Start by strengthening your chest voice with clean, non-compressed exercises.
Build your foundation first (the chest voice sung with full projected voice), then gradually add compression as your voice gets stronger.
If you’re naturally a breathy singer, focus on exercises that build firmer vocal fold closure before adding the edgy compression quality.
Mistake #4: Inconsistent Compression
Compression that comes and goes randomly throughout a song sounds amateurish and uncontrolled.
What it sounds like: Some notes have compression, some don’t, with no artistic reason behind the choices. It sounds like you’re struggling to control your voice rather than making intentional artistic decisions.
How to fix it: Practice singing some of the exercises with varying levels of compression.
Learn to add compression consistently when you want it, then remove it cleanly.
Record yourself and listen back – are your compressed moments intentional and controlled, or are they happening randomly?
Mistake #5: Ignoring Warning Signs
Your voice will tell you when you’re overdoing compression, but many singers ignore these warning signs.
Warning signs you’re over-compressing:
- Voice fatigue after just a few minutes of singing
- Hoarseness after practice sessions
- Throat pain or discomfort
- Feeling like you have to “push” harder to get sound out
What to do: If you experience any of these symptoms, return to gentle, flowing exercises like the “Foo” or lip trills to decompress your voice. If symptoms persist beyond a few days, see an ENT.
Decompression: Your Safety Valve

Here’s something most vocal compression articles don’t tell you:
You need to know how to “decompress” your voice just as much as you need to know how to compress it.
Decompression exercises help balance out the intensity of compression work and give your voice a chance to recover. Think of them as your vocal reset button.
My Three Favorite Decompression Exercises
After you’ve done your vocal compression exercises, it’s important to also “decompress” the voice.
Usually after a particularly intense session, I will have my students decompress their voice with these exercises.
The Lip Trill
Blow air through your lips to create a motorboat sound, then add a gentle “Uh” vowel behind the lips. Sing scales or slides while maintaining the lip trill – going from chest voice to head voice and back down. This naturally prevents over-compression and encourages healthy airflow.
The Tongue Trill
Roll your R’s while singing scales. Like the lip trill, this creates back-pressure that prevents excessive compression while keeping airflow balanced.
The Yawny “Foo”
Sing “Foo” (as in “food”) with a slight yawning quality that opens your throat. This encourages maximum airflow with minimal vocal fold compression – the opposite of what we’ve been working on, which is exactly the point.
When to use decompression exercises:
- After any compression practice session
- When your voice feels tired or strained
- As part of your vocal cool-down routine
- Anytime you notice the warning signs mentioned above
I recommend spending about as much time on decompression exercises as you spend on compression work.
If you practice compression for 20 minutes, follow it with 10 minutes of decompression.
Compression In Different Singing Genres
Compression works differently across musical styles. Here’s how to approach it for different genres:
Rock and Hard Rock

Rock music typically uses the most vocal compression. Think Chris Cornell, Chester Bennington, or Ann Wilson.
The compression adds to the aggressive, powerful aesthetic of the genre.
However, even in rock, great singers balance compressed power moments with cleaner verses.
Listen to how Chester Bennington in Linkin Park would sing verses relatively clean, then add massive compression and distortion for choruses.

Use compression liberally in rock, but still give yourself breaks.
Even the most aggressive rock singers return to cleaner tones periodically.
Contemporary Pop

Modern pop uses compression more subtly than rock.
Think of how Adele adds just a touch of grit on sustained notes, or how P!nk brings edge without sounding harsh.
In pop, compression is often about adding character and emotion without dominating the entire sound. It’s more about texture than aggression.
Good pop singers use compression sparingly as an accent.
One compressed word per line or one slightly gritty sustained note is usually plenty.
Musical Theatre

Contemporary musical theater (especially rock musicals like “Rent,” “Spring Awakening,” or “Hamilton”) often calls for vocal compression to match the style.
However, traditional musical theater generally requires cleaner, more classical tone production. Know which style your show requires.
My recommendation is to watch the compression level to the show’s style.
A rock musical can handle more edge; older musicals typically requires a cleaner tone.
Singer-Songwriter/Indie

This genre often uses subtle compression for emotional authenticity and vulnerability.
Think Brandi Carlile or Hozier – just enough edge to sound raw and real without sounding aggressive.
Note how these singers use compression very selectively for emotional peaks. The rest should be clean and intimate.
The Bottom Line on Vocal Compression

Here’s the bottom line:
Vocal compression is a powerful tool for adding emotion, character, and intensity to your singing.
When used correctly, it can transform your performances from good to unforgettable.
But like any powerful tool, it needs to be handled with care.
Remember these key principles:
- Understand that vocal compression is about balanced vocal fold closure and breath pressure, not squeezing or pushing from your throat and neck.
- Use compression strategically, not constantly. Even in rock music, professionals deploy compression selectively for maximum impact.
- Start slowly and build gradually. Practice compression exercises for just 5-10 minutes at a time when you’re first learning, and always balance compression work with decompression exercises.
- Listen to your voice and body. If you feel worn out after 15 minutes, experience throat discomfort, or notice hoarseness, you’re overdoing it. Back off and focus on cleaner technique until your voice is stronger.
- Study artists who use compression well in your genre. Notice when they use it, when they don’t, and how they balance compressed moments with clean tone.
And finally, remember that healthy vocal compression happens at the vocal fold level through proper technique.
If you’re using external squeezing and tension to create that edgy sound, you’re heading toward vocal damage.
Lastly, remember to balance your compression work with “decompression” exercises!
- Lip trills to reset your voice
- Tongue trills for healthy airflow
- Yawny “Foo” to decompress after compression work
Your voice is your instrument, and learning vocal compression safely will give you more colors to paint with, more emotions to express, and more power to move your audience.
Start with the exercises, be patient with the process, and always prioritize vocal health over achieving a specific sound.
The edge and grit will come as your technique develops.
Ready to add that professional edge to your singing?
Start practicing these compression exercises today, and you’ll be amazed at how much more expressive and powerful your voice becomes!
Want to Nail Those High Notes?
Every singer wants to expand their range. Expand Your Range Fast will show you how to finally hit high notes in your voice without straining. Expand your range by 5 notes or more!